
Hey got a new blog now its now this...
http://simons3dstuff.blogspot.com/
or
simonharvey.carbonmade.com
Wednesday, 29 September 2010
Wednesday, 26 May 2010
Rendering
Its crazy rendering is such a big process, it is such a vital part and making sure everything works properly when it comes to compositing. It is so painful to come in, in the morning and see that your render on the farm is complete yet when you open it something i (we as people) have done wrong. Meaning that whole evening has put you behind its these silly mistakes that turn your day into a bad one, but i have had a great day schedule.
Get up 7ish
Breakfast with Sky Sports News
Play Call of Duty for 30mins
Wash
Clothed
Make lunch
Get to college for 8:30
See renders
Redo renders if needed or composite them
Whilst lightlinking a new shot on my laptop
Set up a render
Have lunch
Check renders
Light link
Set up a render
sometime after 7 leave
Play Call of duty or see girlfriend whilst rendering backgrounds of shots
Sleep at 10:30
Some of the shots!
These are just some of the shots i worked on showing you the lights i used and the final out come of using the light setup. I wish i could put them all on but there really isnt enough time with the amount of work left to do for Friday!
But yeah it jsut gives an insight into what i have been doing!


Lighting Is Done!
Yep thats right, all the shots are lit and are now either movs or are rendering at the moment, so thats all gravy for us and with some motivation the film can be finished for friday hand in. Ther are shots that i want to go back to but i am happy with how my abilities within lighting have developed and it just shows that with a bit of time and patience you can achieve something. I just wish this was the same for animation, but for now i am pleased with the skills i have. Its crazy thinking that i have pretty much inputed lighting in every shot along with Grigsbys lighting he did for us. So yeah once agian i am on to compositing these shots along with alec which has been a great aid, and always wanting the next bit from me, which has kept me on my toes and working hard. Tomorrow will be a day of sorting out folders which i am worried about, i think it may take out the whole day, but needs to be done well! Leaving friday to finish odd bits and bobs and the final shots to composite. Below are jsut some examples of the shots and what was required i also have a quick eample of how i changed the setup.


Its been tough and it has definatly taught me alot about lighting especially light linking something i wasnt to sure of before this project, but it is definatly a useful tool when it is working as i have had some problems with it.


Wednesday, 19 May 2010
Facts and Figures
Today was a good day got four shots done and yesterday i got four done as well, so that means 35 shots have been turned into uncompressed quicktimes. 9 are rendering as we speak leaving 16 left for next tuesday at the latest, so i work it out as around 3 a day. Tonight i hope to have another one ready and start a second, who needs sleep when we are in panic stations.
But yeah apart from being tired occassionally i am happy with what i have learnt and achieved, in term 3, in lighting and compositing, which i really enjoy making me think about what my specialism is and at the moment i really dont know. I definatly know i am not an animator!
Alec and Dan have been doing an amazing job with animating on polished off and i just love to open a new file and watch their animation, before lighting it and just hope i do it justice, but with every shot i am learning something new about lighting and what i should do and tweak. they hope to finish animating on saturday meaning they can take some of the load of me in compositing, which is great news.
Thursday, 13 May 2010
Some Shots
Well, it has been so busy i am finding it hard to get some quality time on the blog, but we are halfway their in terms of rendering which is good and at the moment Im working on some key shots, which will make my life easier as i can recycle the light setup in some shots, like we have done with the base shot.
But today i rendered two shots they arethe bum hitting bed and the ding, i have worked on and off the ding as i wasnt happy with the results, but i am now and below are two screengrabs from these shots. The bum hitting bed was enjoyable and i added fake depth of field within after effects, i cant wait to use a bit more depth of field with some of the other shots!


.ma to .mb error
Ok well i was working on a shot today when it suddenly crashed, i was able to reopen it as a .ma file, i started doing all the work i wanted on it, light linking, changing shaders etc. When i went to save i wanted to save it as a .mb and this error came up...
Error: File contains unknown nodes or data. To preserve this information, the current file type cannot be changed.
Bit anoying as i was worried if the render farm would understand .ma so i did some searching on the internet by putting this error into google and a cg forum came up so i looked at it and some guy called Richard said type in...
Is -type unknown;
this brings up a list of unkwown nodes and for some reason it was looking for renderMan so the way to do this is to type in...
'delete Is -type unknown';
this will deleate the unkown nodes and allow you to save as .mb
Sunday, 9 May 2010

Changes
List for me to change:
Shot 46; afro seams hazey, skin needs some sorting out, polisher looks like it is glowing and jed isnt casting shadows.

Shot 46; afro seams hazey, skin needs some sorting out, polisher looks like it is glowing and jed isnt casting shadows.
Ding; Headphones wrong colour (post work) i changed the colour of occlusion to a blue so orange +blue makes a yellow/green, add a rim light to jed light coming from one source at the moment. Also here is the bg of shot 17 jed walking had to do the texture for the radiator, doh! Also may need to move camera due to the room finishing their.
I hope to have these three ready to render for tomorrow, except the afro!

Sunday At college Banter
Yep thats right at college on a Sunday, i might as well live here i am here so much, but stuff needs to get done and ther are to many distractions at home! So i have been working on shot 46 a bit more and moved on to the Ding as i am stretched for time at the moment and my laptop is playing up a lil bit but i have finally created a skin shader for jed that i am pleased with i am using a maya fast simple skin shader and i think it works well! I have checked the ding shot on different frames and the lighting works well. The only thing i am really worried about is the afro we really need to sort something out? I dont mind giving it a go but i feel it will really dig into time that i need to spend on rendering, lighting and compositing! But anyway some nice pictures for you guys let me know... Dont worry about blurriness on the ding that is my image format, sorry. 


SHOT 46
After talking to Edgley last night i have made some improvements on this shot and i am pretty pleased with it there are still some issues with the polisher but for the majority of it is nearly their! 90% done i think? Oh dont worry about the occlusion i didnt have time to render another one! Also i tried darkining the mouth and it came out with bad results for when he is in the last pose otherwise it is really bright. Any advice on that would be appreciated! Reflections arent correct either at the moment, and brightness can be changed as this is a bit dark?


Saturday, 8 May 2010
WIP
OK people working on Jed singing and tonight i wanted to work on the shot of the whole room and for the first time my laptop has failed and i got fatal error, so im gona talk about the shot that is working. Basically there are a few problems with the room, but that is now resolved so dont worry about anything to do with the room, however i havent solved the missing parts of the polisher and the different colours yet so mainly focus on Jed please and give me some advice as i am stuck now! Oh and it looks really dark on this monitor so i will lighten it up


Friday, 7 May 2010
The Wheel
Ok after discussing the issues with the wheel its finally completed and i tested out my zDepth skills with this one. In maya i rendered off a zDepth pass which is basically a render of close objects white and far away objects black, tweaking this layer in after effects using curves and invert you can then add it to a lens blus on the main layer, which gives a blur, which you are able to control :) once again this one needed some tweaking especially with the occlusion as it was making everything look dull and dark.


Compositing
Well, this week i have been cracking on with rendering shots and so on and can safely say we have done 24 or around that which isnt to bad, just behind schedule. But its hard when some shots need alot of attention to them like th one below this image shows a screen shot from withing after effects and shows the amount of layers i am dealing with now the name conventions were good at the beginning but have slipped over time. And when u get silly mistakes its difficult to know what layer is doing what. The second image is from the shot and before this it was looking pretty bad and the original image is the bottom image, now tweaking had to be done as all the focus on the light setup was on ed, when it should be on the plug and the machine as this is the shot when it all gets rebooted. Whilst looking at a tutorial i realised that you could create lights within after effects, so after some playing around we used a spotlight and a abmient light, which worked great. You cant see in these images but sparks were added to the plug which were inspired by burning safari when the ape gets electricuted, so yeah overall a pretty good day. 
Improved one:
Original one:

Improved one:

Original one:

Tuesday, 4 May 2010
Wheel Shot
Ok at the moment i am really not happy with this shot it doesnt fit with the rest of the shots in terms of lighting and colour and how clean it is. The first image was my initial test the occlusion looks bad, its way to dark and dull, its boring.
My second attempt is from today, which i feel is better, but i still feel it is rather dull, the metal need to be more shiny on the bed, the dirty yellow needs to be lighter and have a more plastic feel. I am happy with the rubber wheel. Im not to sure on the bump on the bed. The cabinet just is a massive bit of colour in the background and the tiles and floor is to dull, but the shot is under the bed how bright is it realisticly going to be? If you guys feel the same as me and have any suggestions let me know! I also prefer the shadows from the old one, maybe an inbetween of the twos shadows?

My second attempt is from today, which i feel is better, but i still feel it is rather dull, the metal need to be more shiny on the bed, the dirty yellow needs to be lighter and have a more plastic feel. I am happy with the rubber wheel. Im not to sure on the bump on the bed. The cabinet just is a massive bit of colour in the background and the tiles and floor is to dull, but the shot is under the bed how bright is it realisticly going to be? If you guys feel the same as me and have any suggestions let me know! I also prefer the shadows from the old one, maybe an inbetween of the twos shadows?

Degree Show
This weekend me and Dan Shuffle have started to put together a list of industry people and companies that we are inviting to our degree show, but it is taking longer than i expected as we want to find names from these companies as we dont want to send out a generic e-mail, but one for each company. I have looked into games and pre production, which has been fairly successful.
As for the website Shuffle has taught me some stuff about html and how to upload images and text on to the website, which is useful for me and beneficial for him as i can now upload peopls work and take some of the burden off him.
As for the website Shuffle has taught me some stuff about html and how to upload images and text on to the website, which is useful for me and beneficial for him as i can now upload peopls work and take some of the burden off him.
Sunday, 2 May 2010
Bank Holiday Tasks
Ok i gave myself a huge task and im not to sure why i did, as i really dont have to much time on weekends to do anything, but i am hopeing to get at least the wheel shot done today and maybe shot 43 again as someone gave me the wrong file. Which, i love the guy who did it and that wont change but it just means an extra hours work on something i thought was sorted, and when we all have tight deadlines its a bit anoying. But anyway try to stick positive as people are always too negative in this world.
So, on friday i worked on the bumshake and i was finally geting somewhere i was happy with and thought yeah its looking good i will go back to it on the weekend only to find i didnt save the file! ahhh, i was so anoyed, but this morning i got it back to its standard i left it on friday, just the pole missing!

I also did a render for shot 6 with lights on basicaly i just used the base shot light set up, it looks bad i havent a clue what that texture is on the matress the shadows on the bed, dont particularly like the ones on the machine, and this is with a bit of work in photoshop as well.

Old School nCloth
Yeah these are a few playblasts that have been chilling on my desktop for a while just showing how we have been using nCloth for some of the shots!
Well i was hopeing to have them here however there is either something wrong with my files or blogger as they wont seem to upload? But they will be on my final dvd :)
Well i was hopeing to have them here however there is either something wrong with my files or blogger as they wont seem to upload? But they will be on my final dvd :)
Thursday, 29 April 2010
Writing
This blog feels more like a story, i use to see it as a place to put images up, but now all i seam to do is type, well one reason is that the shots rendered are way to big to be put up on blogger. But this post will change today i have successfully lit my first scenes for polished off on my own, i was pretty nervous at first, a lot of pressure was on me to get it looking as good as grigs. The two shots were the vroom and finger click shot. Whilst they arent complex scenes and the lighting will be similar to the foot tap and headphones i still had to think carefully about what i was doing and what light was reacting to each model, whilst i did have problems at around 3:30 i was starting to get somewhere and Edgley was also pleased with what i achieved and asked for some changes, which i did and did a little composite test as well, below are the images of these two shots!
Some changes needed are obvious for example jeds clothing in each is different which is due to a few factors, lighting and the shader, this is why i see it has taken Grigs a while to sort out some shots, minor changes to the intensity of a light change everything whilst playing with the diffuse, ambient and incandesence on the shader also allow you to change the way the texture uses the light. FOr the skin i had to create a shader as the UV layout wasnt satisfactory for the shot as the seams were on the side of the hand and fingers, which was very obvious from a test render, the shader is a maya fast skin, meaning it uses sss but only a tiny bit tweaking this was enjoyable and it is great fun as well to see the different effects you can do with it and it is fairly simple to use, but i havent scratched the surface of it.

Some changes needed are obvious for example jeds clothing in each is different which is due to a few factors, lighting and the shader, this is why i see it has taken Grigs a while to sort out some shots, minor changes to the intensity of a light change everything whilst playing with the diffuse, ambient and incandesence on the shader also allow you to change the way the texture uses the light. FOr the skin i had to create a shader as the UV layout wasnt satisfactory for the shot as the seams were on the side of the hand and fingers, which was very obvious from a test render, the shader is a maya fast skin, meaning it uses sss but only a tiny bit tweaking this was enjoyable and it is great fun as well to see the different effects you can do with it and it is fairly simple to use, but i havent scratched the surface of it.


Last week
Well, with the base shot copmplete and renders working it is also my task at the moment to composite the shots, my routine is to light link, change materials, sort out the nCloth, set up the passes, change any animation that is going through other objects, send it to qube, composite in after effects then re render for premier pro. I have to do this with two shots, which is reasonable with the base shot, however those are being used up, meaning i have to work on new shots and light them myself, this started with looking at the Headphone shot Grigs had done and what he did, which i was nearly able to recreate.

Grigs had been rendering the nightshot Pan from home and this week i had been compositing it and we have found some hickups that we can easily see, but hope that because its us no one else will notice to much. But that is now finally rendered out and looking great. I have also learnt some new stuff in maya nCache it basically records nCloth in a seperate layer which is needed for the shots were the oxygen mask or ed hit it, whilst there have been hick ups, i was able to solve it.
I left the week on schedule of the amount of renders and did 4 over the weekend as 2 a day means everyday in the week, which was ok last week, as i had nothing planned, but i think i am beginning to see how daunting these last few weeks are going to be, but hey i will miss it once it is finished, my parents said i wont know what to do once college is finished ant there right, i am going to miss meeting up with the guys watching them animate whilst i render and have a laugh, so i am going to make the most of it!
Sunday, 18 April 2010
Rendering
With shots ready to be animated you would have thought yeah render render render. However, even before this there are so many things to think about and now that Grigs is mainly working on SPLAY it falls to me. We need to light and link objects, change textures, put the nCloth in and make sure its working and set up the layers then get it ready for Qube, then wait for qube! I have found qube a hit and miss sometimes it is amazing whilst other times i feel like it has gone to sleep for a bit, either way it is probably our fault or a bit of both.
So, i have made a new friend Simon Osbourne who knows alot about the render farm and has helped me understand a little bit about how qube works, which is very useful knowledge. He believed one of the reasons qube didnt like our files was because of the shear amount of textures, lights etc. So we met him halfway by lowering our textures whilst he beefed up the render farm, which seems to be good at the moment.
Also whislt things werent going our way i did a render diagnostics which basically shows signs to how well maya will perform the render, we had 216 problems at one point. With textures it said we should change to .map files which are a certain file maya and other 3d packages recognize, this can be done within maya, after doing this the problems went down to around 50. Which is good.
Theroies on what we can do! Well we were aiming to have a trailer for this week, which is unlikely, i was trying to cut corners but couldnt think of much.
Then Edgley rang me up one night puzzling me 'what doesnt move in the base shot?' i was a bit confused and answered 'the machine?'
'yeah go on'
'errr, everything but the Ed and the duvet'
'so why are we tring to render out 700 machines for this one shot if it doesnt move?'
'oh'
So, on wednesday i invested some time into rendering in layers. A basic environment, but producing shadows from the bed and an occlusion of the same. Yhis would be a one off render, that we can put in to the base shot compositing. Then we have a colour and occlusion layer of Ed and the Bed, we are then ready to render, qube also loves this new way of rendering and so does batch if we have to fall back on that!

Lighting 101 and my routine
Well, with a big discussion on Monday about the team, it was decided that Grigs will teach me the way of lighting as he wanted to work on SPLAY, which is fair enough that is why Phil wanted him on the team! Before it was just simple add a physical sunlight and bam your lighting for exteriors was done, but we are working with interiors for Polished Off, so i cant do that anymore.


So for me i am now under a lot of pressure again and it reminds me of trying to use particles, nCloth and Sub Surface Scattering, going into unknown territory and expecting to see results.
So Grigs did an amazing base shot of Ed in bed, however he lost the file, and so we went through this week looking at lighting and how to light link, what each light does and how to use them effectivly. So, we worked on the flowers and after alot of tweaks we were starting to get some results and this is were one of my weaknesses comes in, if i think something looks ok to good then i am happy to leave it and get on with something, this can be good when there are other things to get on with, but i have just realised how important the base shot is. It is featured a lot, so all this week i have been trying to recreate Grigs one image and i am just finding it fairly difficult, but i am not a quitter, but i also know ther are so many more shots to be getting on with and so little time, i need to make the most of college. I have a busy life, monday - friday is college, however two of those nights i have meetings about my youth group, which i am also running days out, which need planning. Then other nights my girlfriend is back from uni. Saturday is work day, i work 9-6 at Argos! Then on sunday is church and youth group, with sunday evening being the only real time i have to relax.
However, i am a fighter and will not back down from a challenge especially one that will mean a lot once i have finished college, below is the base shot so far, guys be as critical as you want! Oh the squares on the right are from the occlusion so dont worry about them! The only real differences i can see is the rail is lighter and the Ed is alot brighter talking to grigs he did this through using a ramp shader, so that should be easy to fix as wel as the rail, however the shadows are different and i feel that is to do with the difference in the pose of Ed and the pillow, which are totally different meaning different shadows something i dont think we can change!


Wednesday, 7 April 2010
polisher 90% done
After Edgley finished modelling the various parts for the polisher i have started to texture them they need to be high quality textures as they will be seen up close. Today i have been making adjustments to the over all colour of the polisher as it was a bit dark. But, also the dial in the polisher, i looked at various images of car dials and other vehicles, which i got a bit carried away with.
I created a neon dial, this would be awesome if it was in the night but, the film isnt so it wont work and look a bit naff, it was created by having a glow map on the texture and a transparency map.

So, i then showed them the texure if it wasnt glowing and they were happy, but adjustments were needed to it, which i am currently working on.

New Chair
Well, the texture has changed and i changed the metal to wood and made the fabric more subtle, so i decided to scrap the old frabic texture and use a new one, i then changed the metal to a ligh brown and added a image of plywood over the top, the other maps needed minor adjustments.

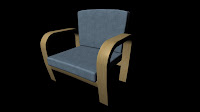


So yeah this sorted now, i have sent it to Grigsby has he needs it for one of the shots and needs to light link it etc so that shot can be rendered off.
Monday, 5 April 2010
How to texture!
Well it came across as i was crolling through my blog that i havent actually said how i create textures or the process i go through to create them, so i thought this bank holiday would be the oppotunity to go through it. So, i will be doing it through a chair Alec modelled for polished off, well the first thing i do is to create the UVs so i can then put them in Photoshop to paint, but in order to get the textures looking good i need to think what will be seen most in the film and what needs the most space in the uv editor.


In this case i decided to make everything have the same amount of space, i also thought carefully about where the seams would be for the object as it will have its back to the wall the seams are at the bottom/back of the cushion and this is the same for the metal as well. Now, if this chair was for a game most would bake an occlusion on to the texture as some game engines wont allow for this as it takes up to many processes, this can me done through the rendering settings and would be put in photoshop over the texture you have created. Below is the uv work i did within maya, i decided to have metal on one side and fabric on the other as it will be easier to handle within photoshop and tweak.

I then use a jpeg of coloured squares and numbers, this jpeg allows me to see if there is any stretching occuring on the object or if anything looks abnormal, i am satisfied with what i see and save the UVs as a jpeg ready for photoshop.

Once in photoshop i always lay down a basic colour in this case a grey for the metal and a navy blue for the fabric, by doing this it is easy to adjust these base colours instead of changing each layer you have created, saving me time and effort. Once i am happy with this i can start adding details.

The details for this object are pretty simple i wanted the metal to have some detail but not overpowering as it is an object in the background so i went for a sort of stainless steel look. In order to do this i created a new layer and used the filter add noise, i then motion blurred this which gave the effect of lines going through my basic colour, i then changed the brightness/contrast. For the fabric i used a texture i already have in my libary, however i think it still needs tweaking as i am not satisfied with it at the moment.

Once this is done it is time to start thinking about other attributes of these materials, for the fabric it will have a bump map to create holes withing the fabric and other areas pushing out, whilst the metal will have some subtle scratches. I also create a spec and reflection texture map, i put these different attributes in groups within photoshop so the file is easy for me to access instead of tweaking individual files it is all there in one file. I then put these files into the shader within maya and then tweak the settings within maya and tweak the textures in photoshop until i am happy with it, i then send it to Edgley to see to get his seal of approval and then goes to Grigsby to light link and make even more beautiful the the default render below.


Friday, 2 April 2010
Texturing Thursday
I wrote before that my weekly tasks were stopped until modelling had been completed, so i decided to take the time out to go back to some of the old textures i created for some of the props, as some only had a colour map at the moment and i hadnt spent much time on them. I am a bit anoyed with my self as i should have started big on some of these textures then reduced it as it is much easier to work this way, instead of making the texture image size larger. So, some of my recent images have been using an occlusion layer but i wanted to try and make the props look as good as they can through the textures themselves so below are the defualt render settings for mental ray no added lights etc. The wetfloor hasnt been rendered but shows in the attributes on the left of the image were i have put the texture files in, this requires alot of time and patience to make sure the specualr is working well with relflections whilst the normal map is correct and not to rough as you need to think about what kind of material you are working with, metal, foam, plastic etc. Which all require different amounts of reflection, spec and normal.


Subscribe to:
Posts (Atom)
