Thursday 29 April 2010

Writing

This blog feels more like a story, i use to see it as a place to put images up, but now all i seam to do is type, well one reason is that the shots rendered are way to big to be put up on blogger. But this post will change today i have successfully lit my first scenes for polished off on my own, i was pretty nervous at first, a lot of pressure was on me to get it looking as good as grigs. The two shots were the vroom and finger click shot. Whilst they arent complex scenes and the lighting will be similar to the foot tap and headphones i still had to think carefully about what i was doing and what light was reacting to each model, whilst i did have problems at around 3:30 i was starting to get somewhere and Edgley was also pleased with what i achieved and asked for some changes, which i did and did a little composite test as well, below are the images of these two shots!

Some changes needed are obvious for example jeds clothing in each is different which is due to a few factors, lighting and the shader, this is why i see it has taken Grigs a while to sort out some shots, minor changes to the intensity of a light change everything whilst playing with the diffuse, ambient and incandesence on the shader also allow you to change the way the texture uses the light. FOr the skin i had to create a shader as the UV layout wasnt satisfactory for the shot as the seams were on the side of the hand and fingers, which was very obvious from a test render, the shader is a maya fast skin, meaning it uses sss but only a tiny bit tweaking this was enjoyable and it is great fun as well to see the different effects you can do with it and it is fairly simple to use, but i havent scratched the surface of it.

Last week

Well, with the base shot copmplete and renders working it is also my task at the moment to composite the shots, my routine is to light link, change materials, sort out the nCloth, set up the passes, change any animation that is going through other objects, send it to qube, composite in after effects then re render for premier pro. I have to do this with two shots, which is reasonable with the base shot, however those are being used up, meaning i have to work on new shots and light them myself, this started with looking at the Headphone shot Grigs had done and what he did, which i was nearly able to recreate.


Grigs had been rendering the nightshot Pan from home and this week i had been compositing it and we have found some hickups that we can easily see, but hope that because its us no one else will notice to much. But that is now finally rendered out and looking great. I have also learnt some new stuff in maya nCache it basically records nCloth in a seperate layer which is needed for the shots were the oxygen mask or ed hit it, whilst there have been hick ups, i was able to solve it.

I left the week on schedule of the amount of renders and did 4 over the weekend as 2 a day means everyday in the week, which was ok last week, as i had nothing planned, but i think i am beginning to see how daunting these last few weeks are going to be, but hey i will miss it once it is finished, my parents said i wont know what to do once college is finished ant there right, i am going to miss meeting up with the guys watching them animate whilst i render and have a laugh, so i am going to make the most of it!

Sunday 18 April 2010

Rendering

With shots ready to be animated you would have thought yeah render render render. However, even before this there are so many things to think about and now that Grigs is mainly working on SPLAY it falls to me. We need to light and link objects, change textures, put the nCloth in and make sure its working and set up the layers then get it ready for Qube, then wait for qube! I have found qube a hit and miss sometimes it is amazing whilst other times i feel like it has gone to sleep for a bit, either way it is probably our fault or a bit of both.

So, i have made a new friend Simon Osbourne who knows alot about the render farm and has helped me understand a little bit about how qube works, which is very useful knowledge. He believed one of the reasons qube didnt like our files was because of the shear amount of textures, lights etc. So we met him halfway by lowering our textures whilst he beefed up the render farm, which seems to be good at the moment.

Also whislt things werent going our way i did a render diagnostics which basically shows signs to how well maya will perform the render, we had 216 problems at one point. With textures it said we should change to .map files which are a certain file maya and other 3d packages recognize, this can be done within maya, after doing this the problems went down to around 50. Which is good.

Theroies on what we can do! Well we were aiming to have a trailer for this week, which is unlikely, i was trying to cut corners but couldnt think of much.
Then Edgley rang me up one night puzzling me 'what doesnt move in the base shot?' i was a bit confused and answered 'the machine?'
'yeah go on'
'errr, everything but the Ed and the duvet'
'so why are we tring to render out 700 machines for this one shot if it doesnt move?'
'oh'

So, on wednesday i invested some time into rendering in layers. A basic environment, but producing shadows from the bed and an occlusion of the same. Yhis would be a one off render, that we can put in to the base shot compositing. Then we have a colour and occlusion layer of Ed and the Bed, we are then ready to render, qube also loves this new way of rendering and so does batch if we have to fall back on that!

Lighting 101 and my routine

Well, with a big discussion on Monday about the team, it was decided that Grigs will teach me the way of lighting as he wanted to work on SPLAY, which is fair enough that is why Phil wanted him on the team! Before it was just simple add a physical sunlight and bam your lighting for exteriors was done, but we are working with interiors for Polished Off, so i cant do that anymore.

So for me i am now under a lot of pressure again and it reminds me of trying to use particles, nCloth and Sub Surface Scattering, going into unknown territory and expecting to see results.

So Grigs did an amazing base shot of Ed in bed, however he lost the file, and so we went through this week looking at lighting and how to light link, what each light does and how to use them effectivly. So, we worked on the flowers and after alot of tweaks we were starting to get some results and this is were one of my weaknesses comes in, if i think something looks ok to good then i am happy to leave it and get on with something, this can be good when there are other things to get on with, but i have just realised how important the base shot is. It is featured a lot, so all this week i have been trying to recreate Grigs one image and i am just finding it fairly difficult, but i am not a quitter, but i also know ther are so many more shots to be getting on with and so little time, i need to make the most of college. I have a busy life, monday - friday is college, however two of those nights i have meetings about my youth group, which i am also running days out, which need planning. Then other nights my girlfriend is back from uni. Saturday is work day, i work 9-6 at Argos! Then on sunday is church and youth group, with sunday evening being the only real time i have to relax.

However, i am a fighter and will not back down from a challenge especially one that will mean a lot once i have finished college, below is the base shot so far, guys be as critical as you want! Oh the squares on the right are from the occlusion so dont worry about them! The only real differences i can see is the rail is lighter and the Ed is alot brighter talking to grigs he did this through using a ramp shader, so that should be easy to fix as wel as the rail, however the shadows are different and i feel that is to do with the difference in the pose of Ed and the pillow, which are totally different meaning different shadows something i dont think we can change!


Wednesday 7 April 2010

polisher 90% done

After Edgley finished modelling the various parts for the polisher i have started to texture them they need to be high quality textures as they will be seen up close. Today i have been making adjustments to the over all colour of the polisher as it was a bit dark. But, also the dial in the polisher, i looked at various images of car dials and other vehicles, which i got a bit carried away with.

I created a neon dial, this would be awesome if it was in the night but, the film isnt so it wont work and look a bit naff, it was created by having a glow map on the texture and a transparency map.


So, i then showed them the texure if it wasnt glowing and they were happy, but adjustments were needed to it, which i am currently working on.

New Chair

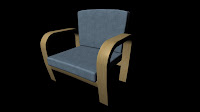
Well, the texture has changed and i changed the metal to wood and made the fabric more subtle, so i decided to scrap the old frabic texture and use a new one, i then changed the metal to a ligh brown and added a image of plywood over the top, the other maps needed minor adjustments.


So yeah this sorted now, i have sent it to Grigsby has he needs it for one of the shots and needs to light link it etc so that shot can be rendered off.

Monday 5 April 2010

How to texture!

Well it came across as i was crolling through my blog that i havent actually said how i create textures or the process i go through to create them, so i thought this bank holiday would be the oppotunity to go through it. So, i will be doing it through a chair Alec modelled for polished off, well the first thing i do is to create the UVs so i can then put them in Photoshop to paint, but in order to get the textures looking good i need to think what will be seen most in the film and what needs the most space in the uv editor.

In this case i decided to make everything have the same amount of space, i also thought carefully about where the seams would be for the object as it will have its back to the wall the seams are at the bottom/back of the cushion and this is the same for the metal as well. Now, if this chair was for a game most would bake an occlusion on to the texture as some game engines wont allow for this as it takes up to many processes, this can me done through the rendering settings and would be put in photoshop over the texture you have created. Below is the uv work i did within maya, i decided to have metal on one side and fabric on the other as it will be easier to handle within photoshop and tweak.


I then use a jpeg of coloured squares and numbers, this jpeg allows me to see if there is any stretching occuring on the object or if anything looks abnormal, i am satisfied with what i see and save the UVs as a jpeg ready for photoshop.


Once in photoshop i always lay down a basic colour in this case a grey for the metal and a navy blue for the fabric, by doing this it is easy to adjust these base colours instead of changing each layer you have created, saving me time and effort. Once i am happy with this i can start adding details.


The details for this object are pretty simple i wanted the metal to have some detail but not overpowering as it is an object in the background so i went for a sort of stainless steel look. In order to do this i created a new layer and used the filter add noise, i then motion blurred this which gave the effect of lines going through my basic colour, i then changed the brightness/contrast. For the fabric i used a texture i already have in my libary, however i think it still needs tweaking as i am not satisfied with it at the moment.


Once this is done it is time to start thinking about other attributes of these materials, for the fabric it will have a bump map to create holes withing the fabric and other areas pushing out, whilst the metal will have some subtle scratches. I also create a spec and reflection texture map, i put these different attributes in groups within photoshop so the file is easy for me to access instead of tweaking individual files it is all there in one file. I then put these files into the shader within maya and then tweak the settings within maya and tweak the textures in photoshop until i am happy with it, i then send it to Edgley to see to get his seal of approval and then goes to Grigsby to light link and make even more beautiful the the default render below.

Friday 2 April 2010

Texturing Thursday

I wrote before that my weekly tasks were stopped until modelling had been completed, so i decided to take the time out to go back to some of the old textures i created for some of the props, as some only had a colour map at the moment and i hadnt spent much time on them. I am a bit anoyed with my self as i should have started big on some of these textures then reduced it as it is much easier to work this way, instead of making the texture image size larger. So, some of my recent images have been using an occlusion layer but i wanted to try and make the props look as good as they can through the textures themselves so below are the defualt render settings for mental ray no added lights etc. The wetfloor hasnt been rendered but shows in the attributes on the left of the image were i have put the texture files in, this requires alot of time and patience to make sure the specualr is working well with relflections whilst the normal map is correct and not to rough as you need to think about what kind of material you are working with, metal, foam, plastic etc. Which all require different amounts of reflection, spec and normal.


Below are some of the uvs for these objects and other objects i have uv'd.

Extra Tasks!

Well if that wasnt enough i did try some animation, however it didnt go to well and Im starting to get worried about my animation folder, which is looking very bare at the moment, if the nCloth counts as animation then hopefully that will boost the folder up a bit, if not then i will do some test animations in my free time, which isnt much at the moment as their is so much to do.

I also created a pebble for Splay, unwrapped the uvs and textured it ready for Grigsby to tweak with the lighting.


The two images above show screenshots from maya and photoshop. Phil wanted the pebble to show resembalance to the houses and also to be tall , showing how even a pebble is against Splay, it was actually quite difficult to model the pebble as i wanted it to be soft like chalk, but also rough in places, but i think the texturing has helped out with this. The other screenshot shows photoshop and a nice normal map, a normal map is a technique used for faking the lighting of bumps and dents on an object, with out using more polygons. Its used alot within games to allow low poly meshes look like high poly meshes because of limitations with polygons.

This weeks Tasks

Well, as said on Monday i have started the polisher in terms of texturing it and rigging it (bend and squash) what all went well, it is not finished but is well on its way. I need to send it to Edgley though as he hasnt finished modelling it yet, so it is all in place and will be done for when i see the guys tuesday. The radiator is also nearly there as well, so i think i will hit my targets for them. just need to sort out a few texture maps.


Once the rigging is complete i will put up those images as well, just to show how it is done and the final textures of the polisher and radiator.